1.15. Payment Cashier
Introduction
Payment Cashier integration allows Payer to choose the payment method for transaction. Payment Cashier can be configured on the Connecting Party side or the Payment Gateway (it is also referred to as Parallel Form) side which is covered in this Use-Case. Connecting Party redirects the Payer to Parallel Form hosted on the Payment Gateway side, the Payer selects one of the available payment methods and tries to perform the payment. Parallel Form can initiate sale or preauth transactions for each configured payment method. Once the transaction is successful, the Payer gets redirected back to the Connecting Party. For more information please see Payment Flow Customization.
To see how the forms can be customized, please follow the Forms Customization reference to see examples and macros of Payment Cashier Page Customization, Payment Page Customization, Prefilled Cardholder Data in Payment Page, Wait Page Customization, and Finish Page Customization.
See terms definitions in Glossary.
Payment Cashier configured in the Payment Gateway has internal structure of Master Endpoints that combine regular Endpoints. Regular Endpoints connected to the Master Endpoint are called Auxiliary Endpoints. Each Auxiliary Endpoint is configured for specific payment method. When making a payment, the Payer can choose the payment method on the Parallel Form. When Payer selects the payment method, Parallel Form initiates an auxiliary transaction on the corresponding Auxiliary Endpoint. If Auxiliary Endpoint currency is different from Master Endpoint currency, the master transaction amount will be converted to respective currency of this payment method. Additionally, Master Endpoints can be consolidated in the Endpoint Group to create single logical unit for multi-currency integrations. See the Options for multi-currency integration and select the preferred option with Billblend support manager.
Payment Cashier Flow
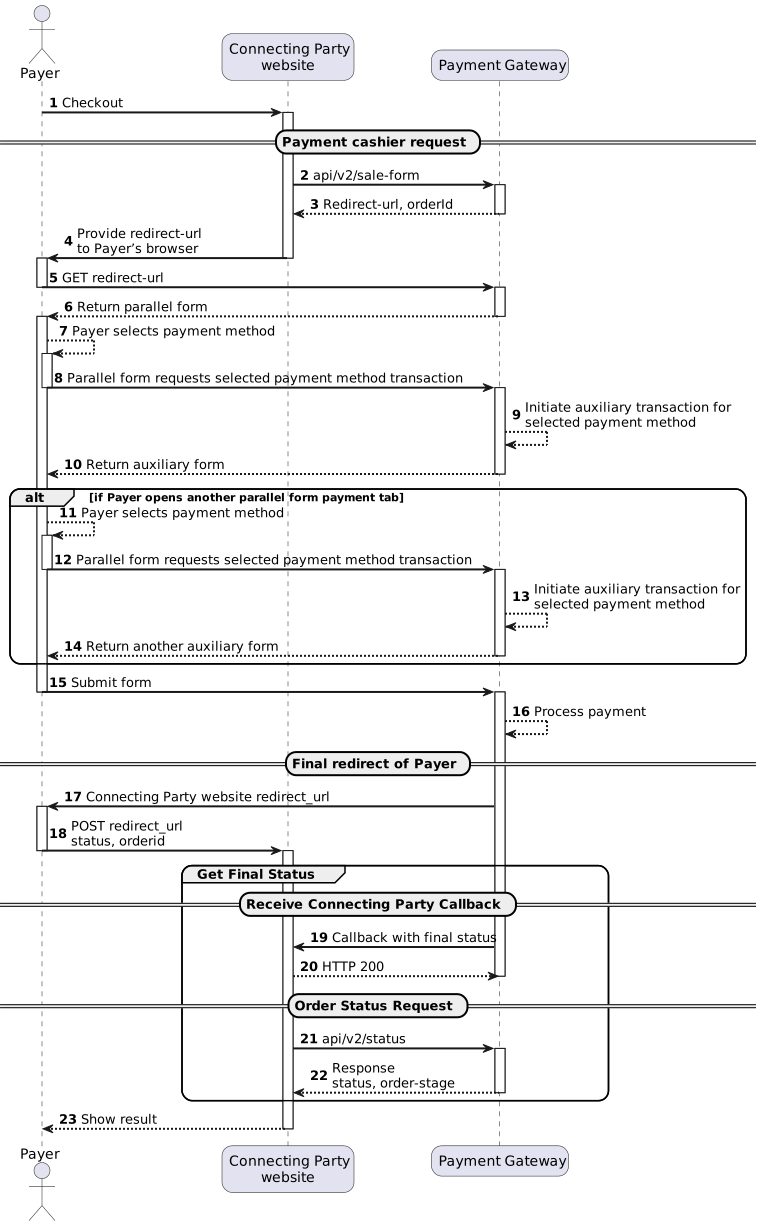
(2) To implement a sale-form request see /api/v2/sale-form/.
(14) To implement the final redirect see Final Redirect.
(16,17) To implement an order status request see /api/v2/status/. Status should be requested multiple times with 3-5-second intervals until final status will be received in response.
(18) To implement callback with final status handling see Connecting Party Callbacks. Callback is sent with the status of the master transaction (cashier transactions). To get additional callbacks about the result of each initiated transactions, please contact Billblend support manager.
Options For Multi-Currency Integration
Payment Cashier can be configured for multiple currencies. For each transaction currency required by Connecting Party, a separate Master Endpoint with unique ID is created. In order to avoid integration to new Master Endpoint IDs for additional currencies support in future, Connecting Party can choose integration to Endpoint Group instead. Endpoint Group is a single logical unit which consolidates Master Endpoints in different currencies. Master Endpoints in new currencies can be added to the same Endpoint Group in future.
![title Options for multi-currency processing integration
package "Integration to Endpoint Group" {
class "layoutHelper1" #ffe6cc;line:black;line.dotted
class "Payment\nmethod 1\ncurrency A" #ffe6cc;line:black;line.dotted
class "Payment\nmethod 2\ncurrency A" #ffe6cc;line:black;line.dotted
class "Payment\nmethod 1\ncurrency B" #dae8fc;line:black;line.dotted
class "Payment\nmethod 2\ncurrency X" #daf9fc;line:black;line.dotted
class "Master Endpoint\n currency A" #ffe6cc;line:black;line.dotted
class "Master Endpoint\n currency B" #dae8fc;line:black;line.dotted
class "Endpoint\nGroup" #ffcdcc;line:black;line.dotted
}
package "Integration to multiple Master Endpoints" {
class "layoutHelper2\n" #ffe6cc;line:black;line.dotted
class "Payment\nmethod 1\ncurrency C" #e1d5e7;line:black;line.dotted
class "Payment\nmethod 2\ncurrency C" #e1d5e7;line:black;line.dotted
class "Payment\nmethod 1\ncurrency D" #dafcdd;line:black;line.dotted
class "Payment\nmethod 2\ncurrency Y" #abf8d8;line:black;line.dotted
class "Master Endpoint\n currency C" #e1d5e7;line:black;line.dotted
class "Master Endpoint\n currency D" #dafcdd;line:black;line.dotted
}
class "layoutHelper3" #ffe6cc;line:black;line.dotted
class "Connecting Party\n (Merchant)" #ececec;line:black;line.bold
"Connecting Party\n (Merchant)" -left-> "Endpoint\nGroup"
"Connecting Party\n (Merchant)" -down-> "layoutHelper3"
"Connecting Party\n (Merchant)" -down-> "Master Endpoint\n currency C"
"Connecting Party\n (Merchant)" -down-> "Master Endpoint\n currency D"
"Endpoint\nGroup" -down- "Master Endpoint\n currency A"
"Endpoint\nGroup" -down- "Master Endpoint\n currency B"
"Master Endpoint\n currency C" -down- "Payment\nmethod 1\ncurrency C"
"Master Endpoint\n currency C" -down- "Payment\nmethod 2\ncurrency C"
"Master Endpoint\n currency D" -down- "Payment\nmethod 1\ncurrency D"
"Master Endpoint\n currency D" -down- "Payment\nmethod 2\ncurrency Y"
"Master Endpoint\n currency A" -down- "Payment\nmethod 1\ncurrency A"
"Master Endpoint\n currency A" -down- "Payment\nmethod 2\ncurrency A"
"Master Endpoint\n currency B" -down- "Payment\nmethod 1\ncurrency B"
"Master Endpoint\n currency B" -down- "Payment\nmethod 2\ncurrency X"
"Connecting Party\n (Merchant)" -left[hidden]- "layoutHelper1"
"Connecting Party\n (Merchant)" -right[hidden]- "layoutHelper2\n"
"layoutHelper1" -[hidden]- "Master Endpoint\n currency A"
"layoutHelper1" -[hidden]- "Master Endpoint\n currency B"
"layoutHelper2\n" -[hidden]- "Master Endpoint\n currency C"
"layoutHelper2\n" -[hidden]- "Master Endpoint\n currency D"
hide members
hide circle
hide layoutHelper1
hide layoutHelper2\n
hide layoutHelper3](https://doc.billblend.com/integration/_images/plantuml-de36dc9db71d0e2af52b54d92d9721bfaa2fd5d4.svg)
Payment Flow Customization Scenarios
Callback Notification Options
By default, callbacks have the following form:
Master Endpoint Callback: client_orderid=A&orderid=B
Auxiliary Endpoint Callback: client_orderid=A&orderid=C (if it is set on an Auxiliary Endpoint)
For correct callback handling on Connecting Party side it is important to note that the callback from the Auxiliary Endpoint may come earlier than the callback from the Master Endpoint (because final status on auxiliary transaction triggers final status on master transaction).
There is another setup that can be preferred over the default one (to enable this feature please contact Billblend support manager) :
Master Endpoint Callback: client_orderid=A&orderid=B
Auxiliary Endpoint Callback: client_orderid=B&orderid=C (if it is set on an Auxiliary Endpoint)
A callback on the Auxiliary Endpoint may be required in two cases:
1. The Connecting Party wants to have complete information about all payment attempts on the Payment Cashier.
2. The Connecting Party implements preauth -> capture/cancel integration on the Payment Cashier. Capture/cancel transactions can be initiated for approved preauth transaction with request sent to Master Endpoint ID by using orderid of the auxiliary transaction. This orderid comes in a callback from an Auxiliary Endpoint when preauth transaction receives the final status.
Redirect Payer After Any Decline
By default, the Payer stays on the Parallel Form if one of the auxiliary transactions is declined, so the Payer can try to pay with another available payment method. There is an option to redirect the Payer to the Connecting Party’s website after receiving an unsuccessful status (decline, filtered, error, etc.) on any payment method tab of the Cashier (auxiliary transaction decline will cause the decline on the master transaction). Please contact Billblend support manager to enable this feature.
Keep Payer on Finish Page
When one of the auxiliary transactions is approved, Parallel Form redirects the Payer back to the Connecting Party’s website (see Final Redirect). There is an option to keep the Payer on Finish Page instead of redirecting for approved auxiliary transaction (it might be useful if Payment Cashier is displayed in an iframe on the Connecting Party’s website). Please contact Billblend support manager to enable this feature.
Forced Payer Redirect
If it is necessary to redirect the Payer to the Finish Page while transaction remains in process, the following code must be added to the forms mentioned below:
Option 1
Auxiliary Finish Form Template:
<script>
        function backToMerchant() {
            window.parent.postMessage(
                "redirect-to-merchant",
                "https://pay.connectingparty.com"
            );
        }
    </script>
</head>
<body onload="backToMerchant()">
<div class="container">
    <div class="main">
        <h2 class="summary__title">Deposit <span class="status-title">${STATUS}</span></h2>
        <div class="back">
            <a class="link" href="#" onclick="backToMerchant()">Back to merchant website</a>
        </div>
    </div>
</div>
Master Payment Form Template:
<script>
    window.addEventListener("message", function(event) {
        if (event.origin !== "https://pay.connectingparty.com")
            return;
        if (event.data === "redirect-to-merchant") {
            window.location.replace("https://connectingparty.com/result");
        }
    }, false);
</script>
Option 2
Auxiliary Finish Form Template:
<div class="container">
    <div class="main">
        <h2 class="summary__title">Deposit <span class="status-title">${STATUS}</span></h2>
        <div class="back">
            <a class="link" target="_parent" href="${CUSTOMER_REDIRECT_URL}">Back to merchant website</a>
        </div>
    </div>
</div>
Subsequent Transactions on Payment Cashier
If the Connecting Party wants to initiate cancel, reversal or capture transactions on Payment Cashier, then Connecting Party needs to send a request to the Master Endpoint ID by using an auxiliary transaction’s order_id. This value can be received in callback from Auxiliary Endpoint together with other details about this transaction. See Callback Notification Options for details and check the transaction flow below.
Cancel Flow
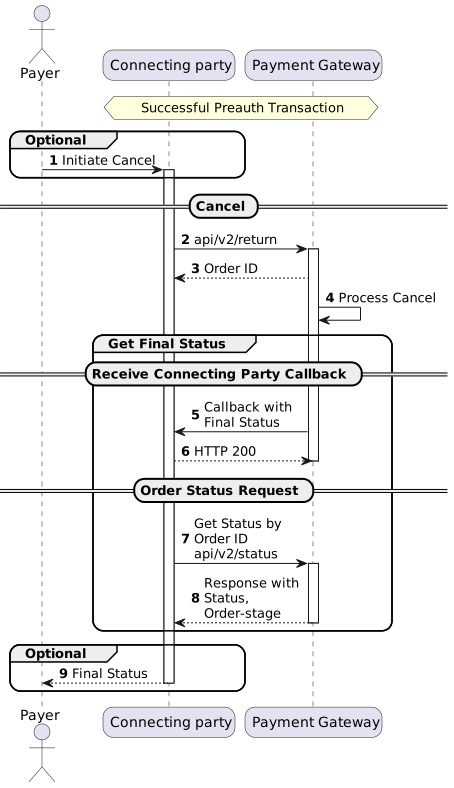
(1) Cancel can be initiated by Connecting Party based on internal business model or Payer’s request.
(2) To implement cancel request see /api/v2/return/.
(5) Callback for Cancel will be sent only if notify_url was provided in initial transaction request or additional callback URL for Cancel transactions is specified on the endpoint level. If server_callback_url was provided in initial transaction request, callback for Cancel will not be sent. To implement callback with final status handling see Connecting Party Callbacks.
(7) To implement order status request see /api/v2/status/. Status should be requested multiple times with 3-5 seconds interval until final status will be received in response.
(9) Final Status can be sent by Connecting Party based on internal business model or by Payer’s request.
Capture Flow
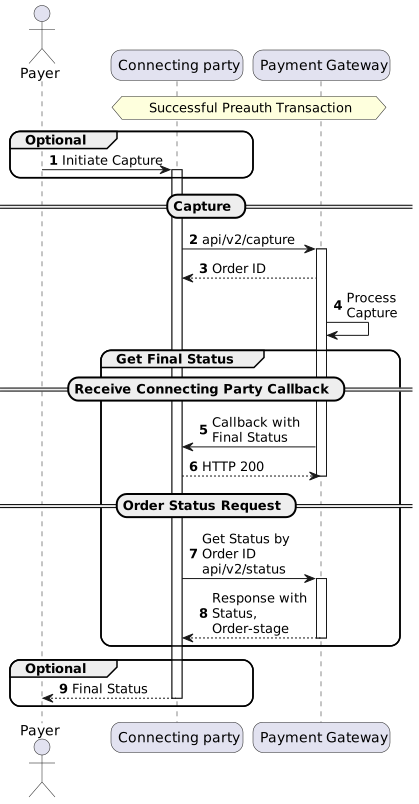
(1) Capture can be initiated by Connecting Party based on internal business model or Payer’s request.
(2) To implement capture request see /api/v2/capture/.
(5) Callback for Capture will be sent only if notify_url was provided in initial transaction request or additional callback URL for Capture transactions is specified on the endpoint level. If server_callback_url was provided in initial transaction request, callback for Capture will not be sent. To implement callback with final status handling see Connecting Party Callbacks.
(7) To implement order status request see /api/v2/status/. Status should be requested multiple times with 3-5 seconds interval until final status will be received in response.
(9) Final Status can be sent by Connecting Party based on internal business model or by Payer’s request.
Reversal Flow
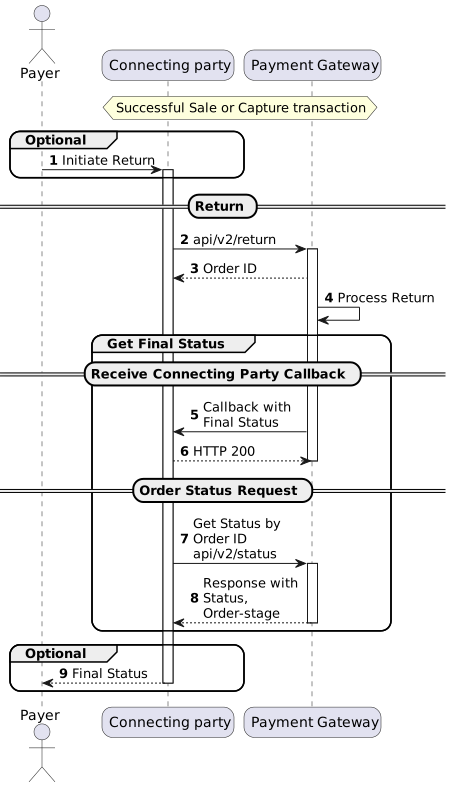
(1) Return can be initiated by Connecting Party based on internal business process or by Payer’s request.
(2) To implement return request see /api/v2/return/.
(5) Callback for Return will be sent only if notify_url was provided in initial transaction request or additional callback URL for Return transactions is specified on the endpoint level. If server_callback_url was provided in initial transaction request, callback for Return will not be sent. To implement callback with final status handling see Connecting Party Callbacks.
(7) To implement order status request see /api/v2/status/. Status should be requested multiple times with 3-5 seconds interval until final status will be received in response.
(9) Final Status can be sent by Connecting Party based on internal business process or Payer’s request.