
1.11. Recurring Sale
Introduction
Recurring (Rebill) Sale is a type of transaction in which funds are debited from the Payer’s side to the Connecting Party’s bank account with previously saved cardholder data. Recurring sale transaction can be initiated manually on Payer’s behalf (this simplifies the payment process for the Payer) or automatically at certain intervals by Connecting Party (i.e. as a subscription model). Payer does not have to re-enter card information, Connecting Party uses Card reference ID to authorize payment. The necessity of Payer’s 3DS check and submit of card security code (CVC, CVV, etc) for recurring sale transactions is determined by bank account settings and related to Connecting Party business type.
See terms definitions (Connecting Party, 3DS Method, etc) in Glossary.
Recurring payments are made in three steps:
1. Initial payment – make initial payment to verify and authorize the Payer’s card. Any transaction type with present cardholder data will work as initial payment – sale, preauth, transfer, etc.
2. Card registration – get Card reference ID and register Payer’s card in Payer’s profile. Card registration requires initial payment to be in final status.
3. Recurring sale – process recurring sale transaction using Card reference ID.
Recurring Sale Flow

Note
Initial payment transaction type and implementation depends on Connecting Party business model. Please contact Billblend support team to get relevant integration Use-Case for initial payment.
(1) To implement Card registration and get Card reference ID see /api/v2/create-card-ref/.
(4) To implement Card information request by Card reference ID see /api/v2/get-card-info/. The contents of response to this request can be used to show information about previously used card to Payer or to update Connecting Party database. This request can be made anytime if Connecting Party has Card reference ID.
(6) Recurring payment can be initiated by Connecting Party based on internal business model or Payer’s request.
(8, 9) Connecting Party sends request to the Payer to submit the CVV/CVC (Card Verification Value/Code), if it is required for selected processing channel.
(10) To initiate recurring sale transaction see /api/v2/make-rebill-sale/. See 3DS Decision Making Schema and 3DS Implementation Scenarios to correctly implement possible 3DS scenarios.
(12) To implement callback with final status handling see Connecting Party Callbacks.
(14) To implement order status see /api/v2/status/. Status should be requested multiple times with 3-5 seconds interval until final status will be received in response.
(16) Results of operation can be sent by Connecting Party based on internal business model or Payer’s request.
3DS Decision Making Schema
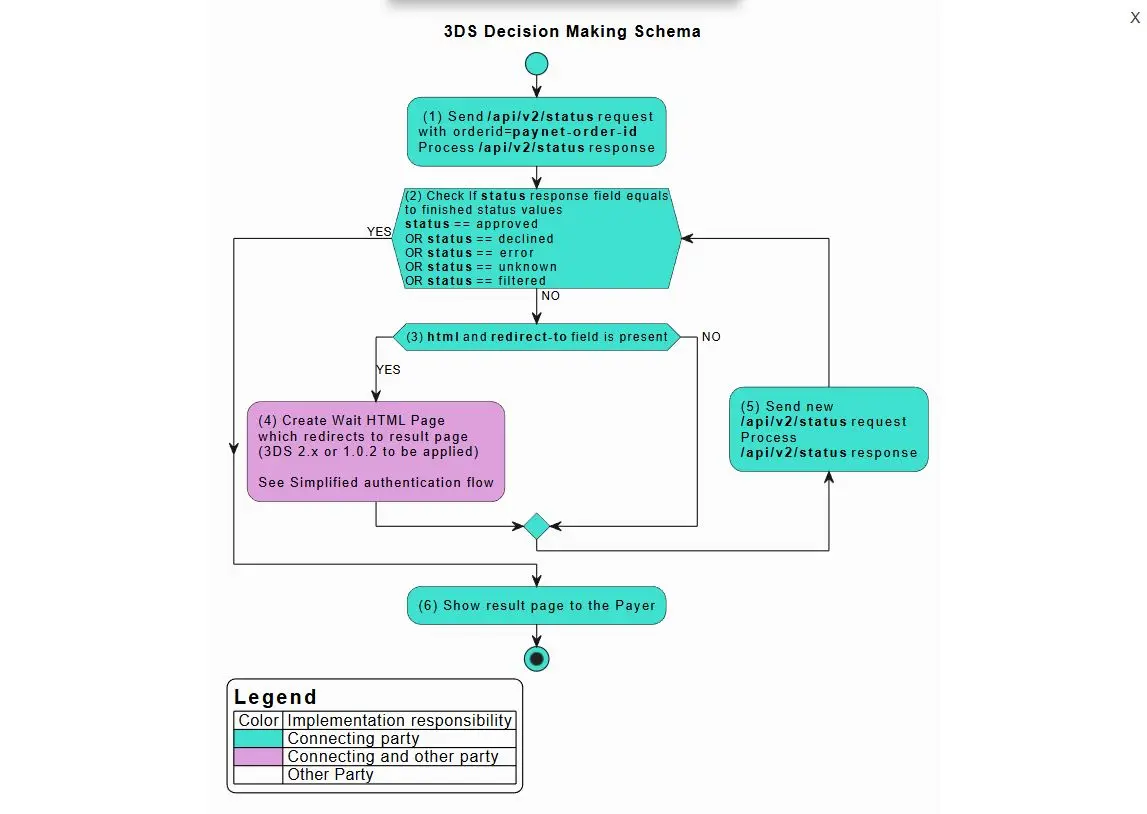
Connecting party has to implement all steps marked in green and purple. Below are the description for steps which reference specific API commands according to the step ID:
(1) To implement order status request see /api/v2/status/. Status should be requested multiple times with 3-5 seconds interval until final status will be received in response.
(5) If tds_status is MethodUrlFrame see 3DS 2.x Frictionless Flow.
(7) If tds_status is CReqForm see 3DS 2.X Challenge Flow.
(9) If tds_status is PaReqForm see 3DS 1.0.2 Authentication Flow.
(11) If tds status is not present, but html and redirect-to fields are present, see Simplified authentication flow with html page.
(12) The same as point (1).
Non3D Flow
Sale transaction should be considered as non3D (no 3DS authentication) if all conditions are met:
1. Steps 1-2-(12)-13 of 3DS decision making schema were followed.
2. tds_status, html and redirect-to parameters were not present.
3. Transaction received final status (approved, declined, error, filtered).
Note
Please note that transaction status “unknown” might appear for both 3DS and non3D transactions. See details in Statuses.
3DS 2.x.0 Frictionless Flow
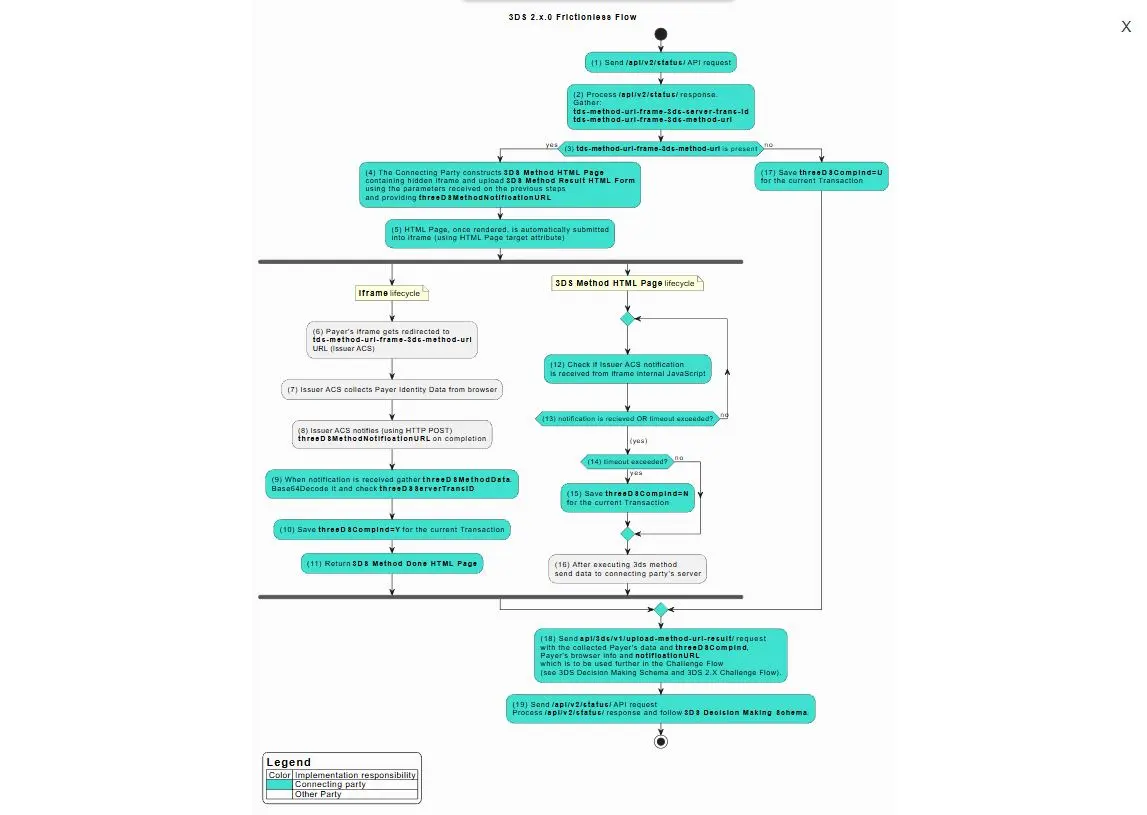
Connecting party has to implement all steps marked in green. Below are the description for steps which reference specific API commands according to the step ID:
(1) To implement order status request see /api/v2/status/. Status should be requested multiple times with 3-5 seconds interval until final status will be received in response.
(2) The same as point (1) .
(4) To construct 3DS Method HTML page see 3DS Method HTML Page Example below.
(9) To process 3DS Method Notification see Process 3DS Method Notification.
(11) To construct 3DS Method Done HTML page see 3DS Method Done HTML Page Example.
(18) To upload method url result see /api/3ds/v1/upload-method-url-result/.
(19) The same as point (1) .
3DS Method HTML Page Example
3DS Method HTML Page example below performs 3DS Method initiation through iframe technique and holding of the Payer’s browser until the 3DS Method is not finished on the Connecting Party server. Once it is finished or timeout is reached Connecting Party has to follow the next steps following 3DS Decision Making Schema and redirect Payer’s browser to the corresponding URL (either Challenge Flow or payment result page). Normal timeout value is 30 sec.
3DS Method HTML Page consists of the following parameters:
| Parameter | Description |
|---|---|
| tds-method-url-frame-3ds-method-url | ACS 3DS Method URL is received by the Connecting Party in the /api/v2/status/ response. |
| tdsMethodUploadUrl | Connecting Party’s URL, where the result comes after the completion of the flow. |
| threeDSMethodData | JSON value containing threeDSServerTransID and threeDSMethodNotificationURL. See below how to construct threeDSMethodData. |
Construct threeDSMethodData
In order to construct threeDSMethodData the Connecting Party has to use the following parameters.
| Parameter | Description |
|---|---|
| threeDSServerTransID | Universally unique transaction identifier assigned by the 3DS Server to identify a single transaction.Received in the /api/v2/status/ response as tds-method-url-frame-3ds-server-trans-id parameter. |
| threeDSMethodNotificationURL | The URL that will receive the notification of 3DS Method completion from the ACS. The Connecting Party is responsible for providing valid threeDSMethodNotificationURL. Normally when the Connecting Party receives any request on this URL is has to return 3DS Method Done HTML Page (see example below). |
threeDSMethodData construction example
- Construct threeDSMethodData JSON
{"threeDSServerTransID":"3d671629-a410-4a5d-9288-b38ceadd41f2","threeDSMethodNotificationURL":"https://merchant.com/3ds-method-complete/"}
- Apply base64 url encoding to resultant JSON
eyJ0aHJlZURTU2VydmVyVHJhbnNJRCI6IjNkNjcxNjI5LWE0MTAtNGE1ZC05Mjg4LWIzOGNlYWRkNDFmMiIsInRocmVlRFNNZXRob2ROb3RpZmljYXRpb25VUkwiOiJodHRwczovL21lcmNoYW50LmNvbS8zZHMtbWV0aG9kLWNvbXBsZXRlLyJ9
Generating Fingerprint.
The 3DS Method can be optionally used by issuers to gather browser fingerprints using JavaScript. This is done by loading a URL in a hidden iframe, before the authentication. This iframe will then execute some fingerprinting JavaScript, before POST’ing to the prespecified URL belonging to the requestor. The 3DS Method fingerprint result is tied to the authentication by the threeDSServerTransID
function gatherBrowserData() {
  var colorDepth = screen.colorDepth; // 24
  var javaEnabled = navigator.javaEnabled(); // true
  var browserLanguage = navigator.language; // en_US
  var screenHeight = screen.height; // 1080
  var screenWidth = screen.width; // 1920
  var userAgent = navigator.userAgent; // Mozilla/5.0 (Windows NT 6.1; Win64; x64) AppleWebKit/537.36 (KHTML, like Gecko) Chrome/70.0.3538.110 Safari/537.36
  var browserTimezoneZoneOffset = new Date().getTimezoneOffset(); // 0
}
Construct 3DS Method HTML page example:
<!DOCTYPE html>
<html lang="en">
<head>
    <meta charset="utf-8"/>
    <title>ACS v2 3DS Method ...</title>
    <style>
.progress{
    position: absolute;
    height: 10px;
    width: 100%;
}
.progress .color{
    position: absolute;
    background-color: #444;
    width: 100%;
    height: 10px;
    animation: progres 11s linear;
}
@keyframes progres{
    0%{
      width: 0%;
     background-color: #ddd;
   }
    25%{
        width: 50%;
        background-color: #ccc;
    }
    50%{
        width: 75%;
        background-color: #bbb;
    }
    75%{
        width: 85%;
        background-color: #aaa;
    }
    100%{
        width: 100%;
        background-color: #777;
    }
};
    </style>
    <script>
var fallbackTimeout = null;
function processForm() {
    document.title = "ACS v2 AReq ...";
    document.getElementById( "browserJavaEnabled"       ).value = navigator.javaEnabled();
    document.getElementById( "browserJavascriptEnabled" ).value = true;
    document.getElementById( "browserLanguage"          ).value = navigator.language;
    document.getElementById( "browserColorDepth"        ).value = screen.colorDepth;
    document.getElementById( "browserScreenHeight"      ).value = screen.height;
    document.getElementById( "browserScreenWidth"       ).value = screen.width;
    document.getElementById( "browserTZ"                ).value = new Date().getTimezoneOffset();
    document.autoForm.submit();
}
function onPostMessage(event) {
    if(!event.data.hasOwnProperty('methodNotification')) {
       return;
    }
    if(fallbackTimeout != null) {
         clearTimeout(fallbackTimeout);
         fallbackTimeout = null;
    }
    document.getElementById( "threeDSCompInd" ).value = 'Y';
    processForm();
}
function onPageLoaded() {
    fallbackTimeout = setTimeout(processForm, 10 * 1000);
    document.methodForm.submit();
    window.addEventListener('message', onPostMessage);
}
    </script>
</head>
<body onload="onPageLoaded()">
<div class="progress">
    <div class="color"></div>
</div>
<iframe style="width:0; height:0; border:0;" name="methodFrame"></iframe>
<form name="methodForm" target="methodFrame" action="[=tds-method-url-frame-3ds-method-url]" method="POST">
    <input type="hidden" name="threeDSMethodData" value="[=threeDSMethodData]">
</form>
<form name="autoForm" action="[=tdsMethodUploadUrl]" method="post">
    <input type="hidden" name="threeDSServerTransID" value="[=threeDSServerTransID]"/>
    <input type="hidden" name="threeDSCompInd" id="threeDSCompInd" value="N"/>
    <input type="hidden" name="browserJavaEnabled"       id="browserJavaEnabled"        value="" />
    <input type="hidden" name="browserJavascriptEnabled" id="browserJavascriptEnabled"  value="" />
    <input type="hidden" name="browserLanguage"          id="browserLanguage"           value="" />
    <input type="hidden" name="browserColorDepth"        id="browserColorDepth"         value="" />
    <input type="hidden" name="browserScreenHeight"      id="browserScreenHeight"       value="" />
    <input type="hidden" name="browserScreenWidth"       id="browserScreenWidth"        value="" />
    <input type="hidden" name="browserTZ"                id="browserTZ"                 value="" />
    <noscript>
        <input type="submit" name="submit" value="Upload 3DS Method Result"/>
    </noscript>
</form>
</body>
</html>
Process 3DS Method Notification
When 3DS Method is completed, the Connecting Party receives HTTP POST request at threeDSMethodNotificationURL with threeDSMethodData, which contains threeDSServerTransID (in base64 encoded JSON).
- Get threeDSMethodData
threeDSMethodData=eyJ0aHJlZURTU2VydmVyVHJhbnNJRCI6IjNkNjcxNjI5LWE0MTAtNGE1ZC05Mjg4LWIzOGNlYWRkNDFmMiJ9Cg
- Apply base64 url decoding to get JSON, which contains threeDSServerTransID
{"threeDSServerTransID":"3d671629-a410-4a5d-9288-b38ceadd41f2"}
3DS Method Done HTML Page Example
<!DOCTYPE html>
<html lang="en">
<head>
    <meta charset="utf-8"/>
    <title>ACS v2 3DS Method Notification Handler...</title>
    <script>
        window.parent.postMessage({ methodNotification: "COMPLETE" }, "*");
    </script>
</head>
<body>
<p>This should not be displayed</p>
</body>
</html>
3DS 2.x.0 Challenge Flow
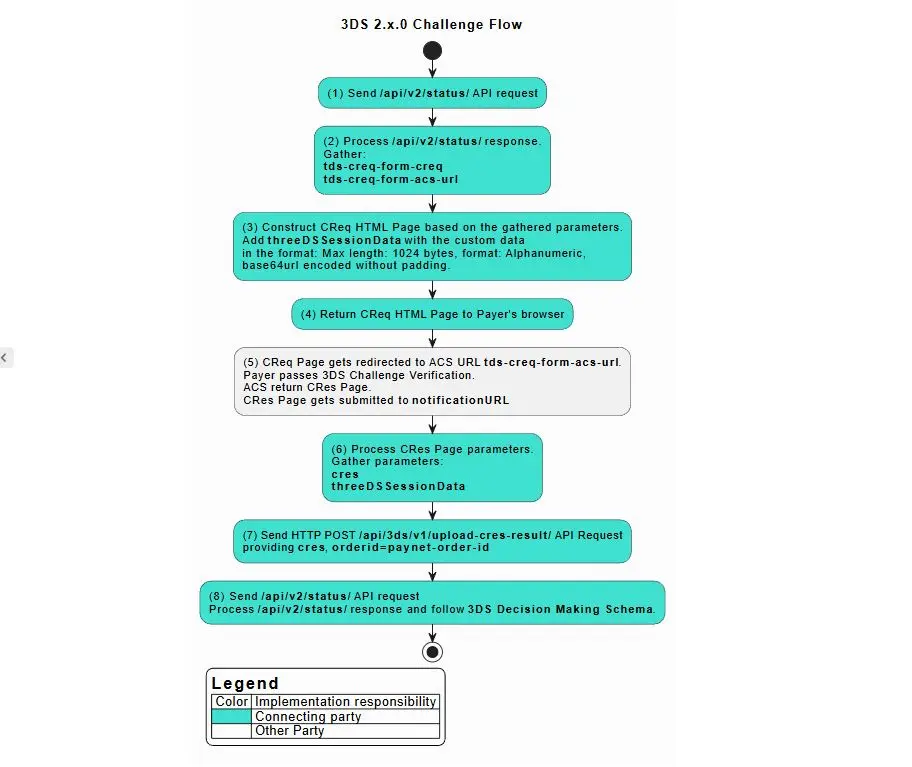
(1) To implement order status request see /api/v2/status/. Status should be requested multiple times with 3-5 seconds interval until final status will be received in response.
(2) The same as point (1) .
(3) To create CReq HTML Page see CReq HTML Page Example.
(5) To implement CRes redirect see CRes redirect.
(7) To upload CRes result see /api/3ds/v1/upload-cres-result/.
(8) The same as point (1) .
CReq HTML Page Example
CReq HTML Page redirects the Payer’s browser to ACS Server URL, provided in tds-creq-form-acs-url parameter. The result CRes value will be returned from ACS to notificationURL provided by Connecting Party on the previous step.
| Field | Description | Necessity |
|---|---|---|
| creq | ACS 3DS CReq data, which received by the Connecting Party in the /api/v2/status/ response. The same as tds-creq-form-creq. | Required |
| threeDSSessionData | value which will be posted back within CRes to notificationURL at the end of the process. Max length: 1024 bytes, format: Alphanumeric, Base64url encoded without padding. | Optional |
<!DOCTYPE html>
<html>
<head>
  <meta http-equiv="content-type" content="text/html; charset=UTF-8">
  <title>Redirecting ...</title>
  <script type="text/javascript" language="javascript">
    function makeSubmit() {
              document.returnform.submit();
        }
  </script>
</head>
<body onLoad="makeSubmit()">
<form name="returnform" action="https://acs.bank-domain.com/mdpayacs/creq" method="POST">
  <input type="hidden" name="creq" value="eyJ0aHJlZURTU2VydmVyVHJhbnNJRCI6ImM1NDA5N2VhLTc0ZTctNDE2My05MTQ4LTNjMTY1NTg3NGIwMCIsImFjc1RyYW5zSUQiOiIxMjU1NTkyMi1lZmYzLTRjOTQtOTk4Mi0yMDM3NjJhMzdmMjkiLCJjaGFsbGVuZ2VXaW5kb3dTaXplIjoiMDIiLCJtZXNzYWdlVHlwZSI6IkNSZXEiLCJtZXNzYWdlVmVyc2lvbiI6IjIuMS4wIn0=">
  <input type="hidden" name="threeDSSessionData" value="NjY4MDU3NQ">
  <noscript>
    <input type="submit" name="submit" value="Press this button to continue"/>
  </noscript>
</form>
</body>
</html>
3DS 1.0.2 Authentication Flow
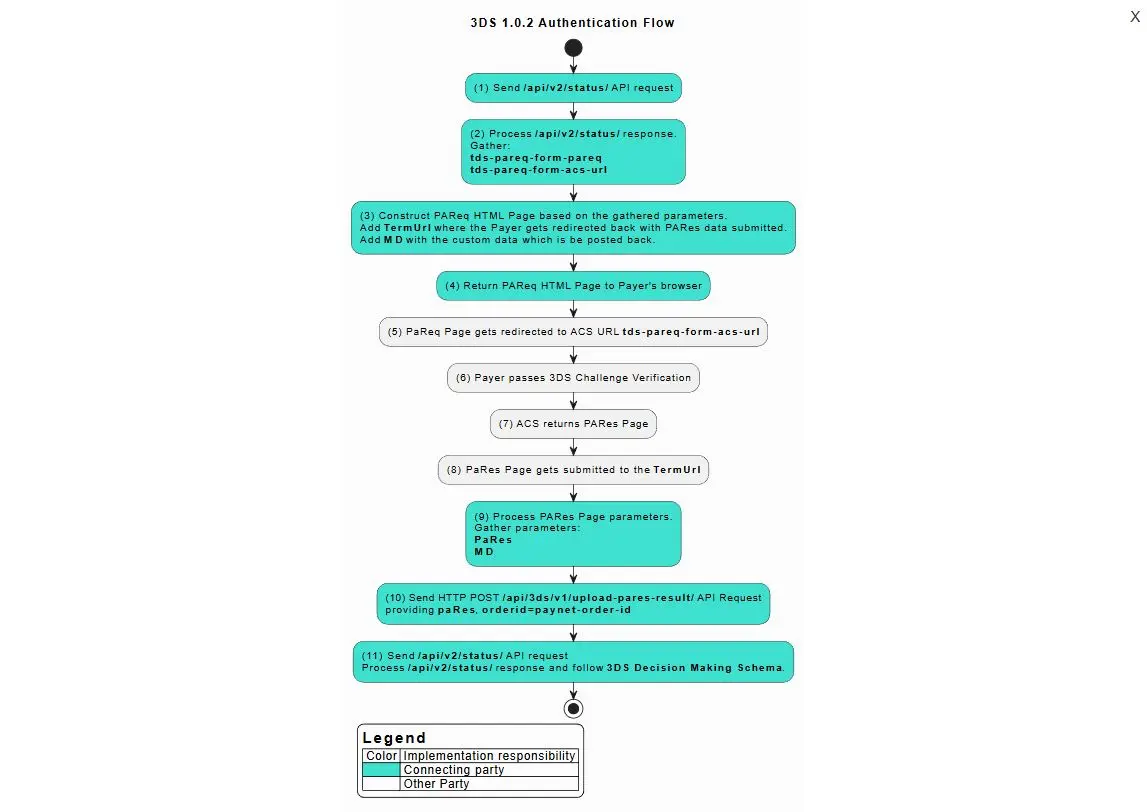
(1) To implement order status request see /api/v2/status/. Status should be requested multiple times with 3-5 seconds interval until final status will be received in response.
(2) The same as point (1) .
(3) To construct PaReq HTML Page see PaReq HTML Page Example.
(5) To implement PaRes redirect see PaRes redirect.
(10) To upload PaRes result see /api/3ds/v1/upload-pares-result/.
(11) The same as point (10) .
PaReq HTML Page Example
PaReq HTML Page redirects the Payer’s browser to ACS Server URL, provided in tds-pareq-form-acs-url parameter.
PaReq HTML Page consists of the following parameters:
| Field | Description | Necessity |
|---|---|---|
| tds-pareq-form-acs-url | ACS 3DS PaReq URL is received by the Connecting Party in the /api/v2/status/ response | Required |
| PaReq | ACS 3DS PaReq data, which received by the Connecting Party in the /api/v2/status/ response. The same as tds-pareq-form-pareq | Required |
| TermURL | URL of termination page, where the Payer gets redirected back with PaRes data submitted | Required |
| MD | Merchant Data (Connecting Party Data), which comes back to your termination page | Optional |
<!DOCTYPE html>
<html>
<head>
  <meta http-equiv="content-type" content="text/html; charset=UTF-8">
  <title>Loading acs..</title>
  <script type="text/javascript" language="javascript">
    function makeSubmit() {
      document.returnform.submit();
    }
  </script>
</head>
<body onLoad="makeSubmit()">
<form name="returnform" action="$tds-pareq-form-acs-url" method="POST">
  <input type="hidden" name="MD" value="some_merchant_data"/>
  <input type="hidden" name="PaReq" value="$tds-pareq-form-pareq"/>
  <input type="hidden" name="TermUrl" value="https://termination.page"/>
  <noscript>
    <input type="submit" name="submit" value="Submit"/>
  </noscript>
</form>
</body>
</html>
Simplified Authentication Flow
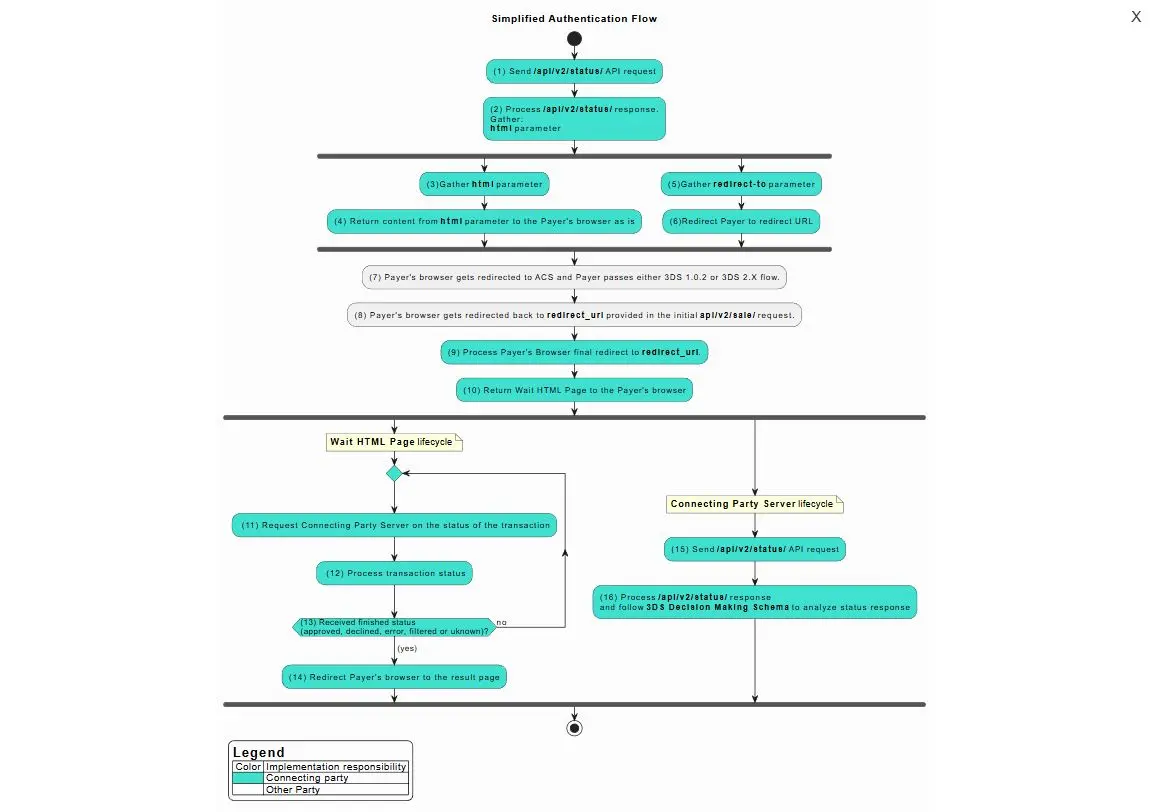
(1) and (2) To implement order status request see /api/v2/status/. Status should be requested multiple times with 3-5 seconds interval until final status will be received in response.
(9) To implement final redirect see Final redirect.
(10) The HTML wait page on Connecting Party side can have custom design and should communicate with Connecting Party server as described on the diagram.
(15) and (16) The same as point (1) and (2) .